

How to plan a garden for beginners
Ever wonder how to plan a garden as a beginner? I am just beginning to step into my gardener-era, and luckily my yard is a fairly blank canvas. We’ve got about six beautiful mature trees on our property, as well a rough outline of some original landscaping done back when the house was built (about 20-years ago or so). The sprinkler system is installed so that the grass and general lawn is watered; however, there are no drip-line systems which, of course, are paramount to keeping new plants alive and growing! So I’ll be tackling that along the way as well.
Now that you have a lay of the land, I wanted to share how I’ve been going about planning my garden as a beginner gardener. I’m going to cover the general outline of how I’m picking out plants, designing landscaping, and arranging them so that I get a lush look. I’m also going to cover raised garden beds, as I have a whole side yard of the house that is perfect to create a secret garden for herbs, veggies, and cut flowers. Read on!
Inspriation:

Inspiration via Better Homes & Garden | Photo by Rinne Allen
Inspiration via Apartment Therapy

Inspiration via The Design Files | Designed by Tim Pilgrim | Photo by Martina Gemmola

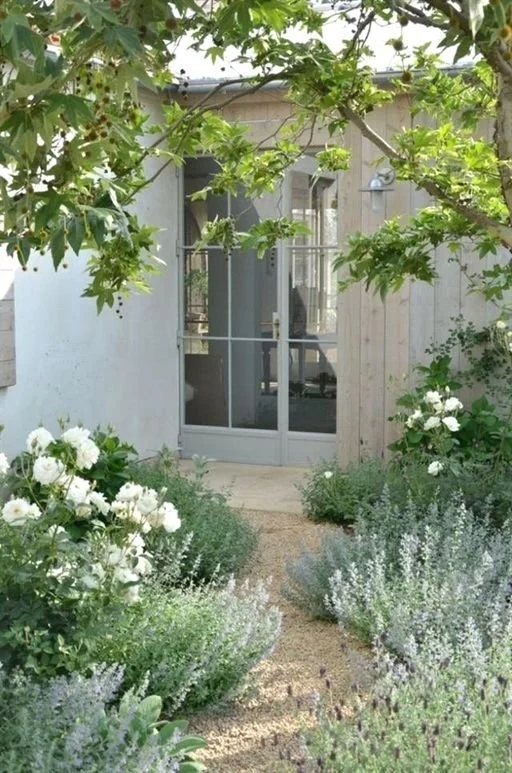
Inspiration via Pinterest

Inspiration via Gardenista | Photo by Matthew Millman courtesy of Scott Lewis
It’s abundantly clear from my inspiration photos that I love a cottage garden look, with lots of layers and wispy growth that makes the spaces feel magical. It’s giving “Secret Garden” meets “Cottage in the Mountains” which I think is appropriate for my design aesthetic as well as the Colorado landscape.
Gathering inspiration images is a great way to get organized and create a vision of what you love. My biggest tip here is to seek out photos of yards with similar climates to your own. There’s no point in me looking for “Mediterranean-style gardens” when none of those plants would thrive in Colorado. Stick with your zone and you’ll save money and time.
Plan Out Sections:

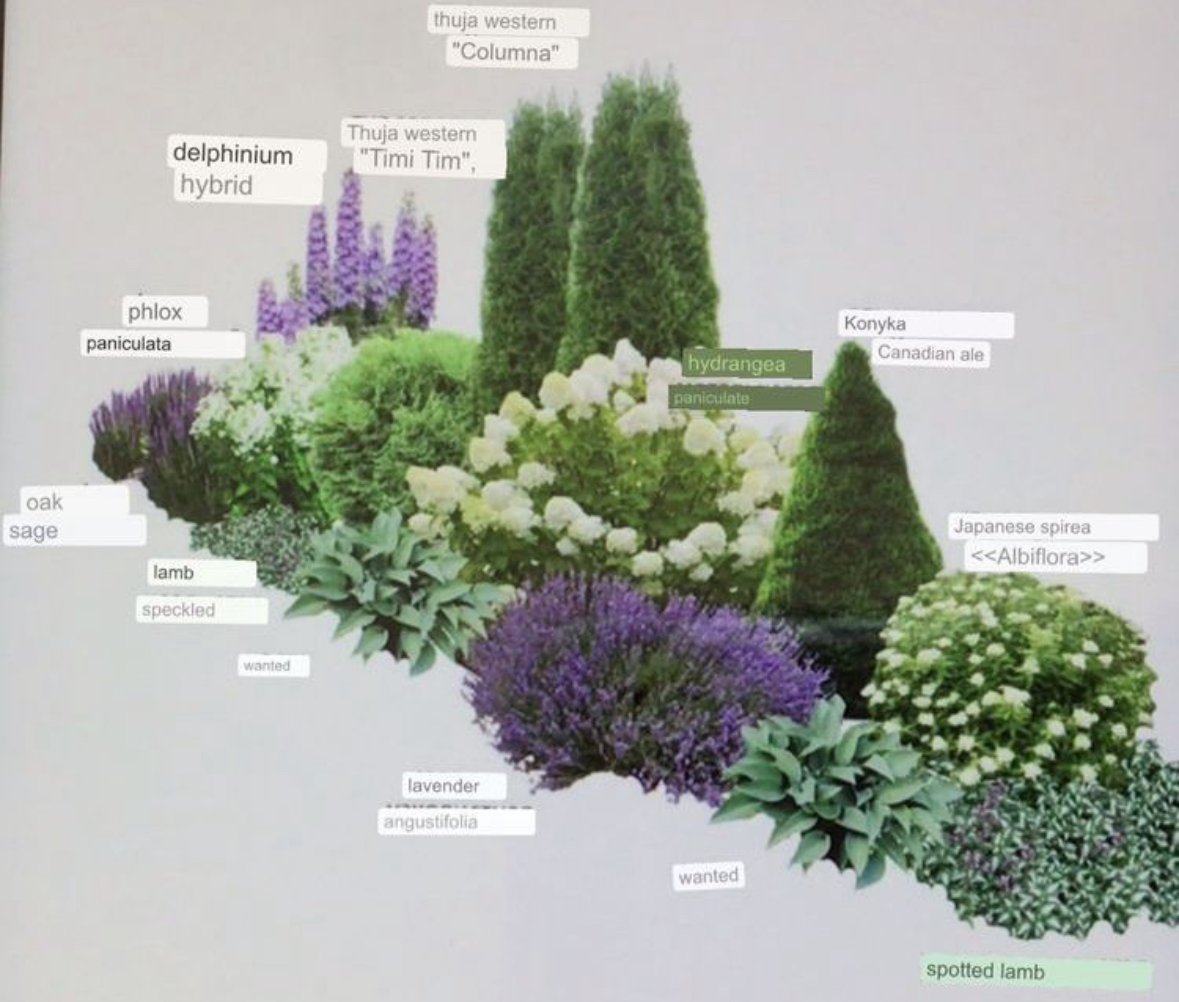
This is a great overview of how to section out your yard and layer it with trees, plants, shrubs, and flowers. Just like in interior design, your landscaping should have tall, medium, and short elements, with a variety of textures mixed in. Additionally, it should follow a set color palette. Maybe you just like greenery with white flowers (I’d wager you also like neutral interiors!) The key is mixing in a ton of various textures to achieve a multi-layered look. Or perhaps you want some color. Play with complementary or contrasting colors to create a cohesive look.
The general formula is a tree to anchor the section + medium shrubs surrounding to balance out the height of the tree + low growing flowers or shrubs to cover the ground, evenly spread out towards the front of the section.


The same formula can be applied on border sections of your yard, or in front of fencing. Depending on the area, the tree should be omitted and replaced by larger shrubs. The main takeaway is that it’s best to loosely plan out the landscape design before heading to the garden center.
In your prep work, be sure to install irrigation throughout the garden sections. This is different than a main sprinkler line, as the water will be at a lower pressure-level and, if it’s a drip-line, slowly dribble out water for a longer period of time.
For my “Mountain Cottage Garden” design, a theme I’m noticing is organic shaped sections - meaning it’s rare to see straight edges in the garden. Rather, a curved edge feels more “secret garden” and naturally formed.
Lastly, determine whether your yard sections are best for full sun, partial sun, or shade plants. Full sun means 6-8 hours of direct sun each day. Partial sun means 3-6 hours of direct sun each day. And shade means less than 3 hours of direct sun each day. Observe your yard and plan accordingly.
Color Scheme + Picking Out Plants:
When looking through my inspiration photos, the color scheme that continues cropping up is soft browns + purples + reds + greens. The soft brown seems to come primarily from ornamental grasses. The purple is a primary color, seen in large or medium shrubs and some lower flowers, with subtle differentiating shades seen in evergreen shrubbery. I’m seeing accents of red in low shrubs and flowers. And then green is seem throughout as a connector.


Here are perennials that grow well in Colorado, which can be a drought-prone climate. All of these fit within the color palette and general aesthetic I’m going for.
Russian Sage (full-sun; 3-5’ height & spread)
Lamb’s Ear (full-sun to partial shade; 8-12” height & 12-36” spread)
Snow in Summer (full-sun; 6-12” height & 9-12” spread)
Penstemon (full-sun to partial shade; 2-4’ height & 3-4’ spread)
Red Valerian (full-sun; 2-3’ height & 18-24” spread)
Feather Reed Grass (full-sun to partial shade; 2-3’ height & 2’ spread)
I’m also a fan of lavender, which grows well in Colorado, and could potentially take the place of Russian Sage (which often attracts a lot of bees). I’m happy that we don’t have to worry about planting trees as well!
To find out what plant hardiness zone you are in, check out the USDA Plant Hardiness Zone map. I cannot stress enough the importance of doing your research and picking out plants that will thrive in your climate. When I live in LA, I was obsessed with bougainvillea. Unfortunately, that is more of a Mediterranean-climate plant and wouldn’t do well in the harsh Colorado winters. Sadly, I’ve had to give up on my bougainvillea dreams - which just leaves opportunity for me to fall in love with mountain plants!
Gardening Basics:
You’ve done your research, planned out your landscaping and picked out your plants. Now it’s time to get gardening! Here’s the basic steps to follow:
Clear the ground, getting rid of weeds, grass and sod in the area you plan on planting in. Lay down a layer of weed barrier fabric or cardboard.
Test your soil and determine if additional nutrients are needed - this will help give your plants a boost! There are plenty of planting soil options with extra compost or organic matter that will encourage growth. Mix this in with the topsoil you dig up.
Dig proper holes for each plant, starting with the larger ones and working down to the smaller ones last. Holes should be larger than the grow pot the plant comes in, but for exact sizing, check the tag on each plant. Sprinkle in your mixture of topsoil and compost-rich planting soil and firmly settle your plant into place in the hole.
Drench with water directly after planting, but after that, follow a watering schedule that your plants need to thrive. Again, this should be listed on the plant tags, or your can do extra research to get on a proper watering plan. Do not over or under water!
Add a layer of mulch on top of the garden section. This helps prevent weeds and keep moisture in. Mulch acts as a sunlight barrier too, which will help keep your plants from frying on summer days.
Maintain your garden and yard. Weed regularly, stick to your watering schedule, and remember to enjoy!
Springtime is typically the best time to plant; however fall can work too, depending on the type of plant. In Colorado, you do not want to plant in the summertime, as the hot sun can easily fry plants before they even take root. And maybe this is obvious, but wintertime is almost never a good time to plant!

Disclosure: My content is reader-supported, which means that when you purchase through links on my site, I may earn an affiliate commission. Learn more here.

My dream yard and landscape setup. One day - right??
Raised Garden Beds:
The last piece of creating a complete landscape puzzle are raised garden beds. I have the perfect spot for them on the side of our house! I can grow veggies, herbs or even cut flowers. My goal is to build one this year, see how it goes and then add more (it’s a large space).

The benefits of raised garden beds are:
Enhanced soil
Extended growing season
Drainage
Pest protection
Weed control
Aesthetic appeal
I find them to be so beautiful and diverse. My first tip is to build them out of cedar or another exterior wood. This will help extend their longevity and prevent rot or other issues from being out in the seasonal elements.
I’m going to do an additional post with a step-by-step process on building your own raised garden beds, so for now, use this as inspiration and general planning for your own yard. Get the wheels turning if a raised garden bed works in your yard, and start to plan out the space for it.
I personally am excited to grow my own herb garden, as well as dip my toe into growing vegetables! Eventually I’d like a dedicated cut flower garden for dahlias or tulips.

Inspiration by Terremoto
I hope this post gets you motivated and excited to create your own dream garden and yard! Keep checking back for more DIY garden builds and projects. Happy gardening!


